Portable Internet Download Manager v5.11 Build 8
http://rapidshare.com/files/69323252/Internet_Download_Man.rar
MS Windows VISTA – Portable USB/CD Edition
http://rapidshare.com/files/37450196/vista_live_cd.part1.rar
http://rapidshare.com/files/37452004/vista_live_cd.part2.rar
http://rapidshare.com/files/37452902/vista_live_cd.part3.rar
Pass : Maestro
microsoft Office 2007 Portable – USB Edition
http://rapidshare.com/files/70937373/MSO2007PE7in1.part1.rar
http://rapidshare.com/files/70950666/MSO2007PE7in1.part2.rar
http://rapidshare.com/files/70953154/MSO2007PE7in1.part3.rar
microsoft Office 2003 Portable – USB Edition
http://rapidshare.com/files/66943509/OFFICE2003.part1.rar
http://rapidshare.com/files/66944848/OFFICE2003.part2.rar
Portable Google Earth 4.2
http://rapidshare.com/files/65844893/GEar42.rar
Adobe Photoshop CS3 Extended Portable Edition
http://rapidshare.com/files/70163801/Adobe_Photoshop_CS3.rar.html
Adobe Dreamweaver CS3 – Portable
http://rapidshare.com/files/54091513/Portable.Adobe.Dreamweaver.CS3.rar
Adobe Illustrator CS3 – Portable
http://rapidshare.com/files/53917797/Adobe_Illustrator_CS3_-_Portable.rar
Adobe Fireworks CS3 – Portable
http://rapidshare.com/files/53915193/Adobe_Fireworks_CS3_-_Portable.rar
Adobe InDesign CS3 – Portable
http://rapidshare.com/files/69993632/Adobe_Creative_Suite_3_Indesign_Portable.part1.rar
http://rapidshare.com/files/70000844/Adobe_Creative_Suite_3_Indesign_Portable.part2.rar
Adobe Photoshop 7(Portable)
http://rapidshare.com/files/70060763/Adobe_Photoshop_7_Portable__ENG_.exe
Nero 8.0.3.0 Portable
http://rapidshare.com/files/59155918/Portable_Nero_8.0.3.0.rar
Mirror
http://www.megaupload.com/?d=7RZ4MZLJ
Winrar 3.71(Portable)
http://rapidshare.com/files/69519843/Winrar.exe
Php Designer 2007 Professional 5.5.2(Portable)
http://rapidshare.com/files/68536374/Php_Designer_2007_Professional_5.5.2_Portable.rar
pass : www.smforum.net
Internet Explorer 7 (Portable)
http://rapidshare.com/files/67493305/IEP7_ByMechoDownload.rar
Password : mechodownload
Opera 9.50 (Portable)
http://rapidshare.com/files/71155803/opera.exe
Portable FlashGet 1.8.6.1008
http://rapidshare.com/files/36549945/G4rPFG18G4r.rar
ACDSee 9.0 Pro (Portable)
http://rapidshare.com/files/68196848/ASDC__p__bY_IzzY.7z
Password:
www.sxforum.org
http://rapidshare.com/files/58712904/995PAS.v9.0.rar
Mirror:
http://www.megaupload.com/?d=0A18B68Z
Pass: www.dl4all.com
Windows Media Player 11 Portable
http://rapidshare.com/files/65293941/wmplayer11.rar
Password : www.shareinplanet.com
Portable Acrobat Reader 8 Full Working
http://rapidshare.com/files/55902338/Acrobat_Reader_8.rar
Password : netsurfz@nattawat.org
Portable Adobe PhotoShop Lightroom 1.3
http://rs78gc.rapidshare.com/files/72810122/P._Adobe_Lightroom_1.3_by_yd.exe
Registry Workshop v3.0.1 (Portable)
http://rapidshare.com/files/64761353/Portable_Registry_Workshop.rar
Portable Windows Doctor 1.7
http://rapidshare.com/files/72463329/P._Windows_Doctor_1.7_by_yd.exe
Portable WinAVI Video Converter v8.0
http://rapidshare.com/files/69805522/Portable.WinAVI.Video.Converter.8.0_www.sharestation.com.exe
pass : www.sharestation.com
Portable JetAudio 7 Plus
http://rapidshare.com/files/24476251/Portable_JetAudio_7_Plus.rar
LimeWire Pro 4.14.8 (Portable)
http://rapidshare.com/files/82961315/Portable_as_LimeWire_PRO_4.14.8_Final.rar
Portable AutoCAD 2008
http://rapidshare.com/files/42977000/ACAD2008P_ByMechoDownload.part1.rar
http://rapidshare.com/files/42980872/ACAD2008P_ByMechoDownload.part2.rar
http://rapidshare.com/files/42983329/ACAD2008P_ByMechoDownload.part3.rar
http://rapidshare.com/files/42985685/ACAD2008P_ByMechoDownload.part4.rar
http://rapidshare.com/files/42988033/ACAD2008P_ByMechoDownload.part5.rar
http://rapidshare.com/files/42990400/ACAD2008P_ByMechoDownload.part6.rar
http://rapidshare.com/files/42992872/ACAD2008P_ByMechoDownload.part7.rar
http://rapidshare.com/files/42992925/ACAD2008P_ByMechoDownload.part8.rar
Rar password: mechodownload
Portable Master Converter 2.8
http://rapidshare.com/files/71957060/T-MC28.rar
Portable ACDSee Photo Manager 10.0.219
http://rapidshare.com/files/71387670/PASPM.v10.0.rar
Portable Nero Burning Rom 8.1.1.3
http://rapidshare.com/files/71261822/Portner8113.rar
Please download and enjoy it.....
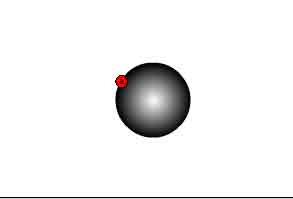
 1. Select your oval tool with line color as black and fill color as white to black radial gradient. Hold your shift key down and draw a circle that is about 1/4 the height of your movie in the center of your stage.
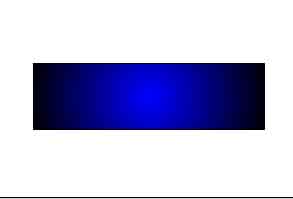 2. Right click on frame 25 and insert a blank key frame. Select your rectangular tool with line color black and fill the blue to black radial gradient.
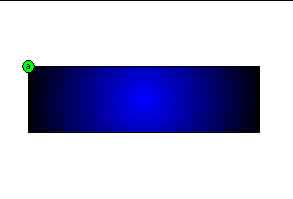
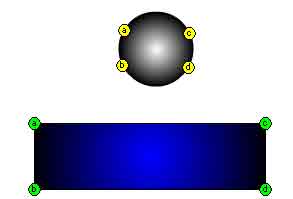 5. Add a new shape hint(b) to frame 1 and set in the 8 o'clock position. Move the hit in frame 25 to the lower left corner. Add shape hint (c) to the 2 o'clock position in frame 1, then put the hint in the upper right hand corner of hte rectangle in frame 25. Add shape hint (d) to the 4 o'clock position and put the hint on frame 25 in the lower right corner of the rectangle.
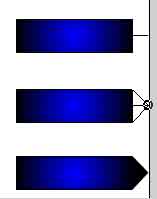 6. Select the line tool and draw a line from the middle right edge of the rectangle in frame 25 our to the edge of your stage.
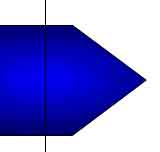


 1. Open a new movie. Open the properties inspector and set the movie properties to a square,
  2. Double click your hand tool on your tool box so your stage fits to screen.
 4. Hold your shift key down and draw a circle that is larger then the stage so all of the stage is covered.
  5. Use your line tool set at 5 pixel thickness and black color to draw a line through the center to split the circle in two. Use the line tool to split those sections so you end up with 4. Split those sections again to end up with 8. Split one more time so you end up with 16.
 8. We need to separate the sliced pie to their own dishes so to speak. Click right on frame one of layer 1 so highlight all the contents on the stage and work area. Click Modify=> distribute to layers. Ea slice should now have it's own layer and the original layer should be empty.
 11. Use your arrow tool to Click-drag over all the frame 1 frames on the layers. This will highlight all the layers. Be careful to click-drag from the get go. If you click then clickdrag you will drag the contents of the frame. Open the properties inspector and select Tween = Shape.
 13. With frame 17 highlighted, and keyframes present there, go to the color mixer. The fill color is Radial rainbow. On the gradient editor, click the first color carrot and then set alpha to 0%.
  14. Click back on frame 1 on any layer. Use the arrow tool to Marquee select all of the pie slices on the stage. Select the transform tool. Select the scale option for transform. Hold your shift key down and scale your shapes to a smallish circle in the center.
 15. Click-drag in a single motion on Layer 2 from frames 1 to 17 to highlight them all. Then mouse over the layer so you can see the rectangle form beneath the cursor. When you see this, you can drag the selected frames to a new location. Drag the frames to the right 1 frame over.
 16. Do the same on layer 3 but drag the content over 2 frames. On layer 4 drag 3 frames. Layer 5 drag 4 frames. Keep going until you have completed the bottom, layer 16. The only layer that has not been moved is the top or first layer.
 17. Click-Drag in one motion from layer1 frame 17 straight down to layer 16, frame 17. Hit F6 to insert keyframes on the highlighted frames. The frame on layer 1 will not change. (If your having trouble highlighting the column together, just click on each frame separately in frame 17 and hit F6.)
 18. Click on the frame on layer 2, frame 18. Since it is a keyframe, and the previous frame is a keyframe we can simply clickdrag the frame over to frame 1 an drop it there. For now ignore the incomplete shape tween leftr on frame 18.
 19. Click-drag to select the layer 3 frames 18-19. Click drag the frames to over frames 1-2 and drop. These frames will fill 1 and two. For now, ignore the incomplete shape tween left on frame 18-19.
 20. Click-drag to select the layer 4 frames 18-20. Click drag the frames to over frames 1-3 and drop. These frames will fill 1 and two. For now, ignore the incomplete shape tween left on frame 18-20.
 23. Right click and select Remove Frames from the menu.

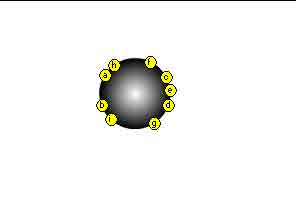
 2. Click View=> Pointer. This should take you to the pointer template for making the inside pointer in your compass. With your pen tool set to black stroke, click on the point marked 8. click on the point marked 9.
 3. Set the start box to arrowhead #3. Set the end box to arrowhead 17. Set the scale to 50% and click ok.
  7. Select your scissors tool
  8. Repeat steps 4-7 for a segment connecting Points B and b.
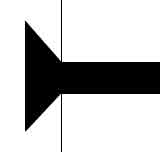
 11. Use the selection tool to select the 3-a line segment. Since a was the ending point of our drawing, we will need to put our arrowhead on the end when we stylize it. Click Filter=> Stylize Add Arrowheads. Set the start to none. Set the end to arrowhead 15 and scale to 100%.
 13. Use the select tool to add arrowheads # 14 at 150% to the starting ends of E and D (if you started your segment on E or D.). If you goof, just click edit=> undo. Add arrowheads to e and d on the start end so the result so far looks like on the right.
 15. Select the pen tool set to black stroke. Click without releasing at point 1 to add an anchor there and drag to the right to the red handle dot. This will bend the line some. CLick in point 2 and drag down to the red handle dot. Click on point 3 and drag left to the red handle point. Click on point 3 and drag up to the red point. Mouse over point 1 until you see a o appear next to your pen tool. The circle means that by clicking there you will close the shape. Click to close the shape and drag to the right again to the red dot. You should have a nice black outline circle now. Use your selection tool to select it and change the stroke weight to 5 pt.
 16. While the bubble circle is still highlighted, click on the fill color swatch on the tool box. Open your color palette and set the CMYK color of 40, 0, 50,0 so that a faint green fills your circle. Set the transparency to 45 percent.


 19. Now double click the scale tool again. Set the scale to 95% uniform and click copy. Now set the weight to 10 point with dashed line, dash 1 pt, gap 5 point.
 21. Click View=> bubble to display the template for making the bubble. Choose the pen tool. Set your stroke to white and your fill to no fill for now. Set the stroke weight to 1 on the stroke palette. The dotted lines of the template represent where we want the resulting directional lines and handles to go. Click on the number 5 point and drag up and to the right to match the dotted line. Click on the number 6 point and drag down and to the right so that the opposite handle and direction follows the dotted line above point 6. Hold your alt key down and click directly on the anchor for point 6and drag down again, but this time matching the handle below the #6.
  Click on point 7 and drag to the left to match the handles. mouse over the end point to see the o under the pen tool. hold your alt key down and click drag up until the direction and handle below matches the bottom dotted line. Set the transparency palette to softlight, 100%. You can rotate if need be.